最近在研究进程间通信,linux下进程间通信的方式主要有Pipe(管道),FIFO(命名管道),信号,共享内存,消息队列,信号灯等,这些方式各有各得特点,如管道是linux下命令行中常用的,用于父子进程的通信。但是这些通信方式都比较原始,要属功能最强大的IPC应该是dbus,故查看了一下dbus的资料,但是资料相对较少,特别是有关python的部分。
1.dbus概念
网上有一篇叫“D-Bus Tutorial”的文章,流传较广。
D-Bus是针对桌面环境优化的IPC(interprocess communication )机制,用于进程间的通信或进程与内核的通信。最基本的D-Bus协议是一对一的通信协议。但在很多情况下,通信的一方是消息总线。消息总线是一个特殊的应用,它同时与多个应用通信,并在应用之间传递消息。下面我们会在实例中观察消息总线的作用。消息总线的角色有点类似与X系统中的窗口管理器,窗口管理器既是X客户,又负责管理窗口。
支持dbus的系统都有两个标准的消息总线:系统总线和会话总线。系统总线用于系统与应用的通信。会话总线用于应用之间的通信。网上有一个叫d-feet的python程序,我们可以用它来观察系统中的dbus世界。
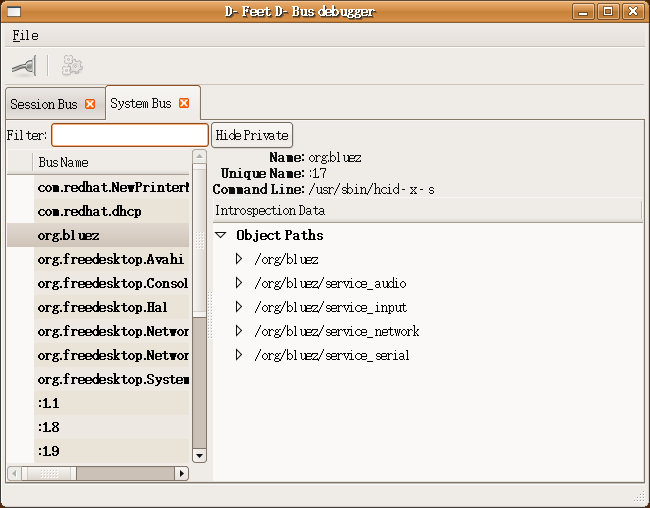
图1、由d-feet观察到的D-Bus世界
dbus还提供了两个命令行工具用于dbus测试,dbus-send和dbus-monitor,前一个命令用于测试信号的发送,后一个命令用于监控dbus的数据流。
2.dbus概念
有关dbus的基础知识不在本文的范围内,具体的参见dbus的文档。下面给出dbus常用的流程。
2.1建立服务的流程
dbus_bus_get(),建立一个dbus连接;
dbus_bus_request_name(),为这个dbus连接(DbusConnection)起名,这个名字将会成为我们在后续进行远程调用的时候的服务名;
然后我们进入监听循环 -- dbus_connection_read_write();
从总线上取出消息 -- dbus_connection_pop_message();
并通过比对消息中的方法接口名和方法名 -- dbus_message_is_method_call();
如果一致,那么我们跳转到相应的处理中去;
在相应的处理中,我们会从消息中取出远程调用的参数。并且建立起回传结果的通路 -- reply_to_method_call()。回传动作本身等同于一次不需要等待结果的远程调用。
2.2建立服务的流程
建立好dbus连接之后,为这dbus连接命名,申请一个远程调用通道 -- dbus_message_new_method_call(),注意,在申请远程调用通道的时候,需要填写服务器名,本次调用的接口名,和本次调用名(方法名)。压入本次调用的参数 -- dbus_message_iter_init_append(); dbus_message_iter_append_basic(),实际上是申请了一个首地址,我们就是把我们真正要传的参数,往这个首地址里面送(送完之后一般都会判断是否内存越界了)。然后就是启动发送调用并释放发送相关的消息结构 -- dbus_connection_send_with_reply()。这个启动函数中带有一个句柄。我们马上会阻塞等待这个句柄给我们带回总线上回传的消息。当这个句柄回传消息之后,我们从消息结构中分离出参数。用dbus提供的函数提取参数的类型和参数 -- dbus_message_iter_init(); dbus_message_iter_next(); dbus_message_iter_get_arg_type(); dbus_message_iter_get_basic()。也就达成了我们进行本次远程调用的目的了。
2.3发送信号的流程
建立一个dbus连接之后,为这个dbus连接起名,建立一个发送信号的通道,注意,在建立通道的函数中,需要我们填写该信号的接口名和信号名 -- dbus_message_new_signal()。然后我们把信号对应的相关参数压进去 -- dbus_message_iter_init_append(); dbus_message_iter_append_basic()。然后就可以启动发送了 -- dbus_connection_send(); dbus_connection_flush。
2.4信号接收流程
建立一个dbus连接之后,为这个dbus连接起名,为我们将要进行的消息循环添加匹配条件(就是通过信号名和信号接口名来进行匹配控制的) -- dbus_bus_add_match()。我们进入等待循环后,只需要对信号名,信号接口名进行判断就可以分别处理各种信号了。在各个处理分支上。我们可以分离出消息中的参数。对参数类型进行判断和其他的处理。
3. 一个C语言的示例代码
网上大部分代码都是基于dbus的一个封装库libdbus做的,以及使用glib,gtk的事件循环;为了减少库的依赖,直接使用C语言调用dbus的底层函数编写一个远程调用的示例代码,代码很简单,没使用GObject等一些复杂的库。
远程调用的服务器代码,用于监控,代码如下:
#include <dbus/dbus.h>
#include <stdbool.h>
#include <unistd.h>
#include <stdio.h>
#include <stdlib.h>

void reply_to_method_call(DBusMessage* msg, DBusConnection* conn)
{
   DBusMessage* reply;
   DBusMessageIter args;
   bool stat = true;
   dbus_uint32_t level = 21614;
   dbus_uint32_t serial = 0;
   char* param = "";

   // read the arguments
   if (!dbus_message_iter_init(msg, &args))
      fprintf(stderr, "Message has no arguments!\n");
   else if (DBUS_TYPE_STRING != dbus_message_iter_get_arg_type(&args))
      fprintf(stderr, "Argument is not string!\n");
   else
      dbus_message_iter_get_basic(&args, ¶m);

   printf("Method called with %s\n", param);

   // create a reply from the message
   reply = dbus_message_new_method_return(msg);

   // add the arguments to the reply
   dbus_message_iter_init_append(reply, &args);
   if (!dbus_message_iter_append_basic(&args, DBUS_TYPE_BOOLEAN, &stat)) {
      fprintf(stderr, "Out Of Memory!\n");
      exit(1);
   }
   if (!dbus_message_iter_append_basic(&args, DBUS_TYPE_UINT32, &level)) {
      fprintf(stderr, "Out Of Memory!\n");
      exit(1);
   }

   // send the reply && flush the connection
   if (!dbus_connection_send(conn, reply, &serial)) {
      fprintf(stderr, "Out Of Memory!\n");
      exit(1);
   }
   dbus_connection_flush(conn);

   // free the reply
   dbus_message_unref(reply);
}


static void
reply_to_Introspect(DBusMessage* msg, DBusConnection* conn)
{
	/*反馈的消息*/
	char *xml = "<!DOCTYPE node PUBLIC \"-//freedesktop//DTD D-BUS Object Introspection 1.0//EN\"\n\"http://www.freedesktop.org/standards/dbus/1.0/introspect.dtd\">\n"
	"<node>\n"
	"  <interface name=\"org.freedesktop.DBus.Introspectable\">\n"
	"    <method name=\"Introspect\">\n"
	"      <arg name=\"introspection_xml\" direction=\"out\" type=\"s\"/>\n"
	"    </method>\n  </interface>\n"
	"  <interface name=\"test.method.Type\">\n"
	"    <method name=\"Method\">\n"
	"      <arg name=\"level\" direction=\"out\" type=\"i\"/>\n"
	"      <arg name=\"serial\" direction=\"out\" type=\"i\"/>\n"
	"    </method>\n"
	"  </interface>\n"
	"</node>\n";
	DBusMessage* reply;
   DBusMessageIter args;
   bool stat = true;

   // create a reply from the message
   reply = dbus_message_new_method_return(msg);
   // add the arguments to the reply
   dbus_message_iter_init_append(reply, &args);

   if (!dbus_message_iter_append_basic(&args, DBUS_TYPE_STRING, &xml)) {
      printf ("Dbus Error: append args error\n");
      dbus_message_unref(reply);
      return;
   }
   // send the reply && flush the connection
   if (!dbus_connection_send(conn, reply, NULL)) {
      printf ("Dbus Error: send error\n");
      dbus_message_unref(reply);
      return;
   }
   dbus_connection_flush(conn);
   // free the reply
   dbus_message_unref(reply);
}

/**
* Server that exposes a method call and waits for it to be called
*/
void listen()
{
   DBusMessage* msg;
   DBusMessage* reply;
   DBusMessageIter args;
   DBusConnection* conn;
   DBusError err;
   int ret;
   char* param;

   printf("Listening for method calls\n");

   // initialise the error
   dbus_error_init(&err);

   // connect to the bus and check for errors
   conn = dbus_bus_get(DBUS_BUS_SESSION, &err);
   if (dbus_error_is_set(&err)) {
      fprintf(stderr, "Connection Error (%s)\n", err.message);
      dbus_error_free(&err);
   }
   if (NULL == conn) {
      fprintf(stderr, "Connection Null\n");
      exit(1);
   }

   // request our name on the bus and check for errors
   ret = dbus_bus_request_name(conn, "test.method.server",
                               DBUS_NAME_FLAG_REPLACE_EXISTING , &err);
   if (dbus_error_is_set(&err)) {
      fprintf(stderr, "Name Error (%s)\n", err.message);
      dbus_error_free(&err);
   }
   if (DBUS_REQUEST_NAME_REPLY_PRIMARY_OWNER != ret) {
      fprintf(stderr, "Not Primary Owner (%d)\n", ret);
      exit(1);
   }

   // loop, testing for new messages
   while (true) {
      // non blocking read of the next available message
      dbus_connection_read_write(conn, 0);
      msg = dbus_connection_pop_message(conn);

      // loop again if we haven't got a message
      if (NULL == msg) {
         sleep(1);
         continue;
      }

      // check this is a method call for the right interface & method
      if (dbus_message_is_method_call(msg, "test.method.Type", "Method"))
         reply_to_method_call(msg, conn);
      /*实现反射接口*/
      if (dbus_message_is_method_call(msg, "org.freedesktop.DBus.Introspectable", "Introspect"))
	 reply_to_Introspect(msg, conn);
      // free the message
      dbus_message_unref(msg);
   }
}


int main(int argc, char** argv)
{

   listen();
   return 0;
}
代码中很关键的一个地方是一个标准接口的实现,该接口虽说无实际意义,仅仅是反射出该session的接口信息,包含各个接口信息和信号信息,但是该信息在python版的dbus中调用很重要,否则python的调用会失败。
编译命令如下
gcc -o main main.c `pkg-config --cflags --libs dbus-1`
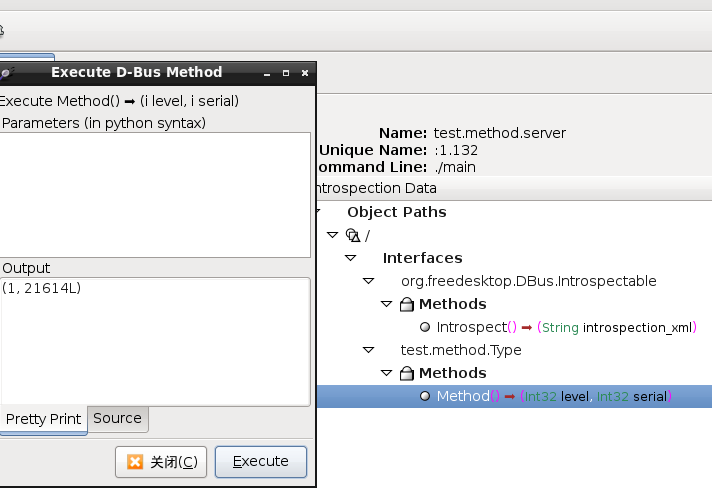
可以用d-feet测试一下:
用dbus-send测试命令如下:
dbus-send --session --type=method_call --print-reply --dest=test.method.server / test.method.Type.Method
客户端代码(及远程调用的代码):
#include <dbus/dbus.h>
#include <stdbool.h>
#include <unistd.h>
#include <stdio.h>
#include <stdlib.h>
/**
 * Call a method on a remote object
 */
void query(char* param)
{
   DBusMessage* msg;
   DBusMessageIter args;
   DBusConnection* conn;
   DBusError err;
   DBusPendingCall* pending;
   int ret;
   bool stat;
   dbus_uint32_t level;

   printf("Calling remote method with %s\n", param);

   // initialiset the errors
   dbus_error_init(&err);

   // connect to the system bus and check for errors
   conn = dbus_bus_get(DBUS_BUS_SESSION, &err);
   if (dbus_error_is_set(&err)) {
      fprintf(stderr, "Connection Error (%s)\n", err.message);
      dbus_error_free(&err);
   }
   if (NULL == conn) {
      exit(1);
   }

   // request our name on the bus
   ret = dbus_bus_request_name(conn, "test.method.caller", DBUS_NAME_FLAG_REPLACE_EXISTING , &err);
   if (dbus_error_is_set(&err)) {
      fprintf(stderr, "Name Error (%s)\n", err.message);
      dbus_error_free(&err);
   }
   if (DBUS_REQUEST_NAME_REPLY_PRIMARY_OWNER != ret) {
      exit(1);
   }

   // create a new method call and check for errors
   msg = dbus_message_new_method_call("test.method.server", // target for the method call
                                      "/test/method/Object", // object to call on
                                      "test.method.Type", // interface to call on
                                      "Method"); // method name
   if (NULL == msg) {
      fprintf(stderr, "Message Null\n");
      exit(1);
   }

   // append arguments
   dbus_message_iter_init_append(msg, &args);
   if (!dbus_message_iter_append_basic(&args, DBUS_TYPE_STRING, ¶m)) {
      fprintf(stderr, "Out Of Memory!\n");
      exit(1);
   }

   // send message and get a handle for a reply
   if (!dbus_connection_send_with_reply (conn, msg, &pending, -1)) { // -1 is default timeout
      fprintf(stderr, "Out Of Memory!\n");
      exit(1);
   }
   if (NULL == pending) {
      fprintf(stderr, "Pending Call Null\n");
      exit(1);
   }
   dbus_connection_flush(conn);

   printf("Request Sent\n");

   // free message
   dbus_message_unref(msg);

   // block until we recieve a reply
   dbus_pending_call_block(pending);

   // get the reply message
   msg = dbus_pending_call_steal_reply(pending);
   if (NULL == msg) {
      fprintf(stderr, "Reply Null\n");
      exit(1);
   }
   // free the pending message handle
   dbus_pending_call_unref(pending);

   // read the parameters
   if (!dbus_message_iter_init(msg, &args))
      fprintf(stderr, "Message has no arguments!\n");
   else if (DBUS_TYPE_BOOLEAN != dbus_message_iter_get_arg_type(&args))
      fprintf(stderr, "Argument is not boolean!\n");
   else
      dbus_message_iter_get_basic(&args, &stat);

   if (!dbus_message_iter_next(&args))
      fprintf(stderr, "Message has too few arguments!\n");
   else if (DBUS_TYPE_UINT32 != dbus_message_iter_get_arg_type(&args))
      fprintf(stderr, "Argument is not int!\n");
   else
      dbus_message_iter_get_basic(&args, &level);

   printf("Got Reply: %d, %d\n", stat, level);

   // free reply
   dbus_message_unref(msg);
}


int main(int argc, char** argv)
{
    char* param = "no param";
    query(param);
    return 0;
}
执行结果:
Calling remote method with no param
Request Sent
Got Reply: 1, 21614
4.Pthon调用dbus
#!/usr/bin/env python
# -*- coding:utf-8 -*-
import dbus
bus = dbus.SessionBus()
bus_obj = bus.get_object('test.method.server', '/')

interface = dbus.Interface(bus_obj, 'test.method.Type')
info = interface.Method()
print info